“Ever wished you could build your own robot or control lights with just a few lines of code?”
Arduino lets anyone try electronics, even if you’ve never done it before. The parts are easy to use, and the software is simple.
You don’t need to be a coding genius to start. If you’ve ever plugged in a USB cable or built a LEGO set, you’re already qualified to start.
What is Arduino???
Arduino is an italian open-source electronics platform based on easy-to-use hardware and software. Arduino consists of both a physical programmable circuit board (often referred to as a microcontroller) and a piece of software or IDE (Integrated Development Environment) that runs on your computer, used to write and upload code to the physical board.
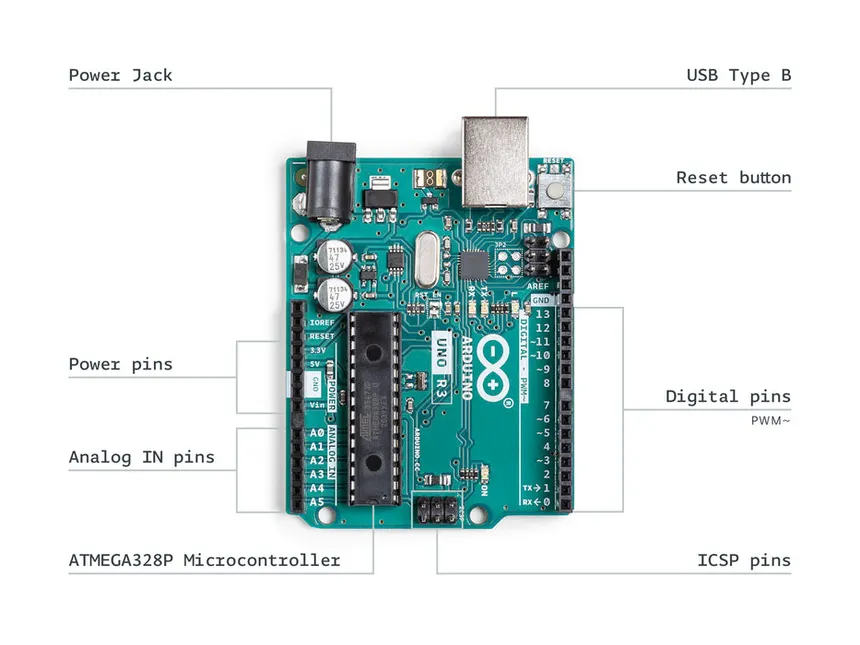
What’s on the Arduino Board??
Pins
The Arduino board is equipped with a variety of pins that serve different purposes in connecting and controlling electronic components.- Digital Pins: There are 14 digital pins (numbered 0–13) on the Arduino board. These pins can read or write digital signals—either HIGH (on) or LOW (off)—to and from connected devices.
- PWM Pins: Out of the digital pins, 6 are PWM (Pulse Width Modulation) pins, marked with a tilde (~). PWM pins allow you to simulate analog output by varying the signal between 0 and 255, useful for controlling things like LED brightness or motor speed.
- Analog Input Pins: The board includes 6 analog input pins (A0–A5). These pins can read a range of voltage values, letting you capture sensor data with greater precision (values from 0 to 1023).
- Power Pins: These pins supply voltage (3.3V or 5V) and ground (GND) connections to power external components and sensors.
- Communication Pins: The board also features pins for serial communication, such as TX (transmit) and RX (receive), which are used to communicate with your computer or other devices.
- GND Pins: These are the ‘Ground’ pins. The Arduino board has 3 GND pins, and any of them can be used to complete the circuit by providing a common ground connection.
Reset Button
The Arduino reset button is a Physical button on the board, which is when pressed, causes the microcontroller to temporarily connect the reset pin to the ground and restart any code that is loaded on the Arduino.USB Type B Port
The USB Type B port is used to connect the Arduino board to your computer. This connection serves two purposes: it powers the board and allows you to upload code from the Arduino IDE to the microcontroller.Power Jack
The power jack allows you to supply external power to the Arduino board, typically using a 7–12V DC adapter. This is useful when your project requires more power than what the USB connection can provide, or when you want your Arduino to run independently of your computer.ATMEGA328P Microcontroller
The ATMEGA328P microcontroller is the brain of the Arduino board. It stores and executes the code uploaded from the Arduino IDE, manages all inputs and outputs, and handles logic and timing for your projects.ICSP Pins
These are ICSP(In-Circuit Serial Programming) Pins. These pins are mainly used for low-level programming of the microcontrollers, like burning the bootloader or uploading firmware.
Arduino IDE
The Arduino IDE (Integrated Development Environment) is an open-source software written in Java that runs on multiple platforms including Windows, macOS, and Linux. It serves as the primary tool for writing, compiling, and uploading code to Arduino boards.
Just like other code editors, the Arduino IDE provides a user-friendly interface with features like syntax highlighting, auto-indentation, and error messaging, which make writing code easier even for beginners. One of its biggest advantages is the simplicity — you can write your code (called a “sketch”) and upload it to your Arduino board with just a single click.
You can download the IDE from the official Arduino website, and it’s completely free to use.
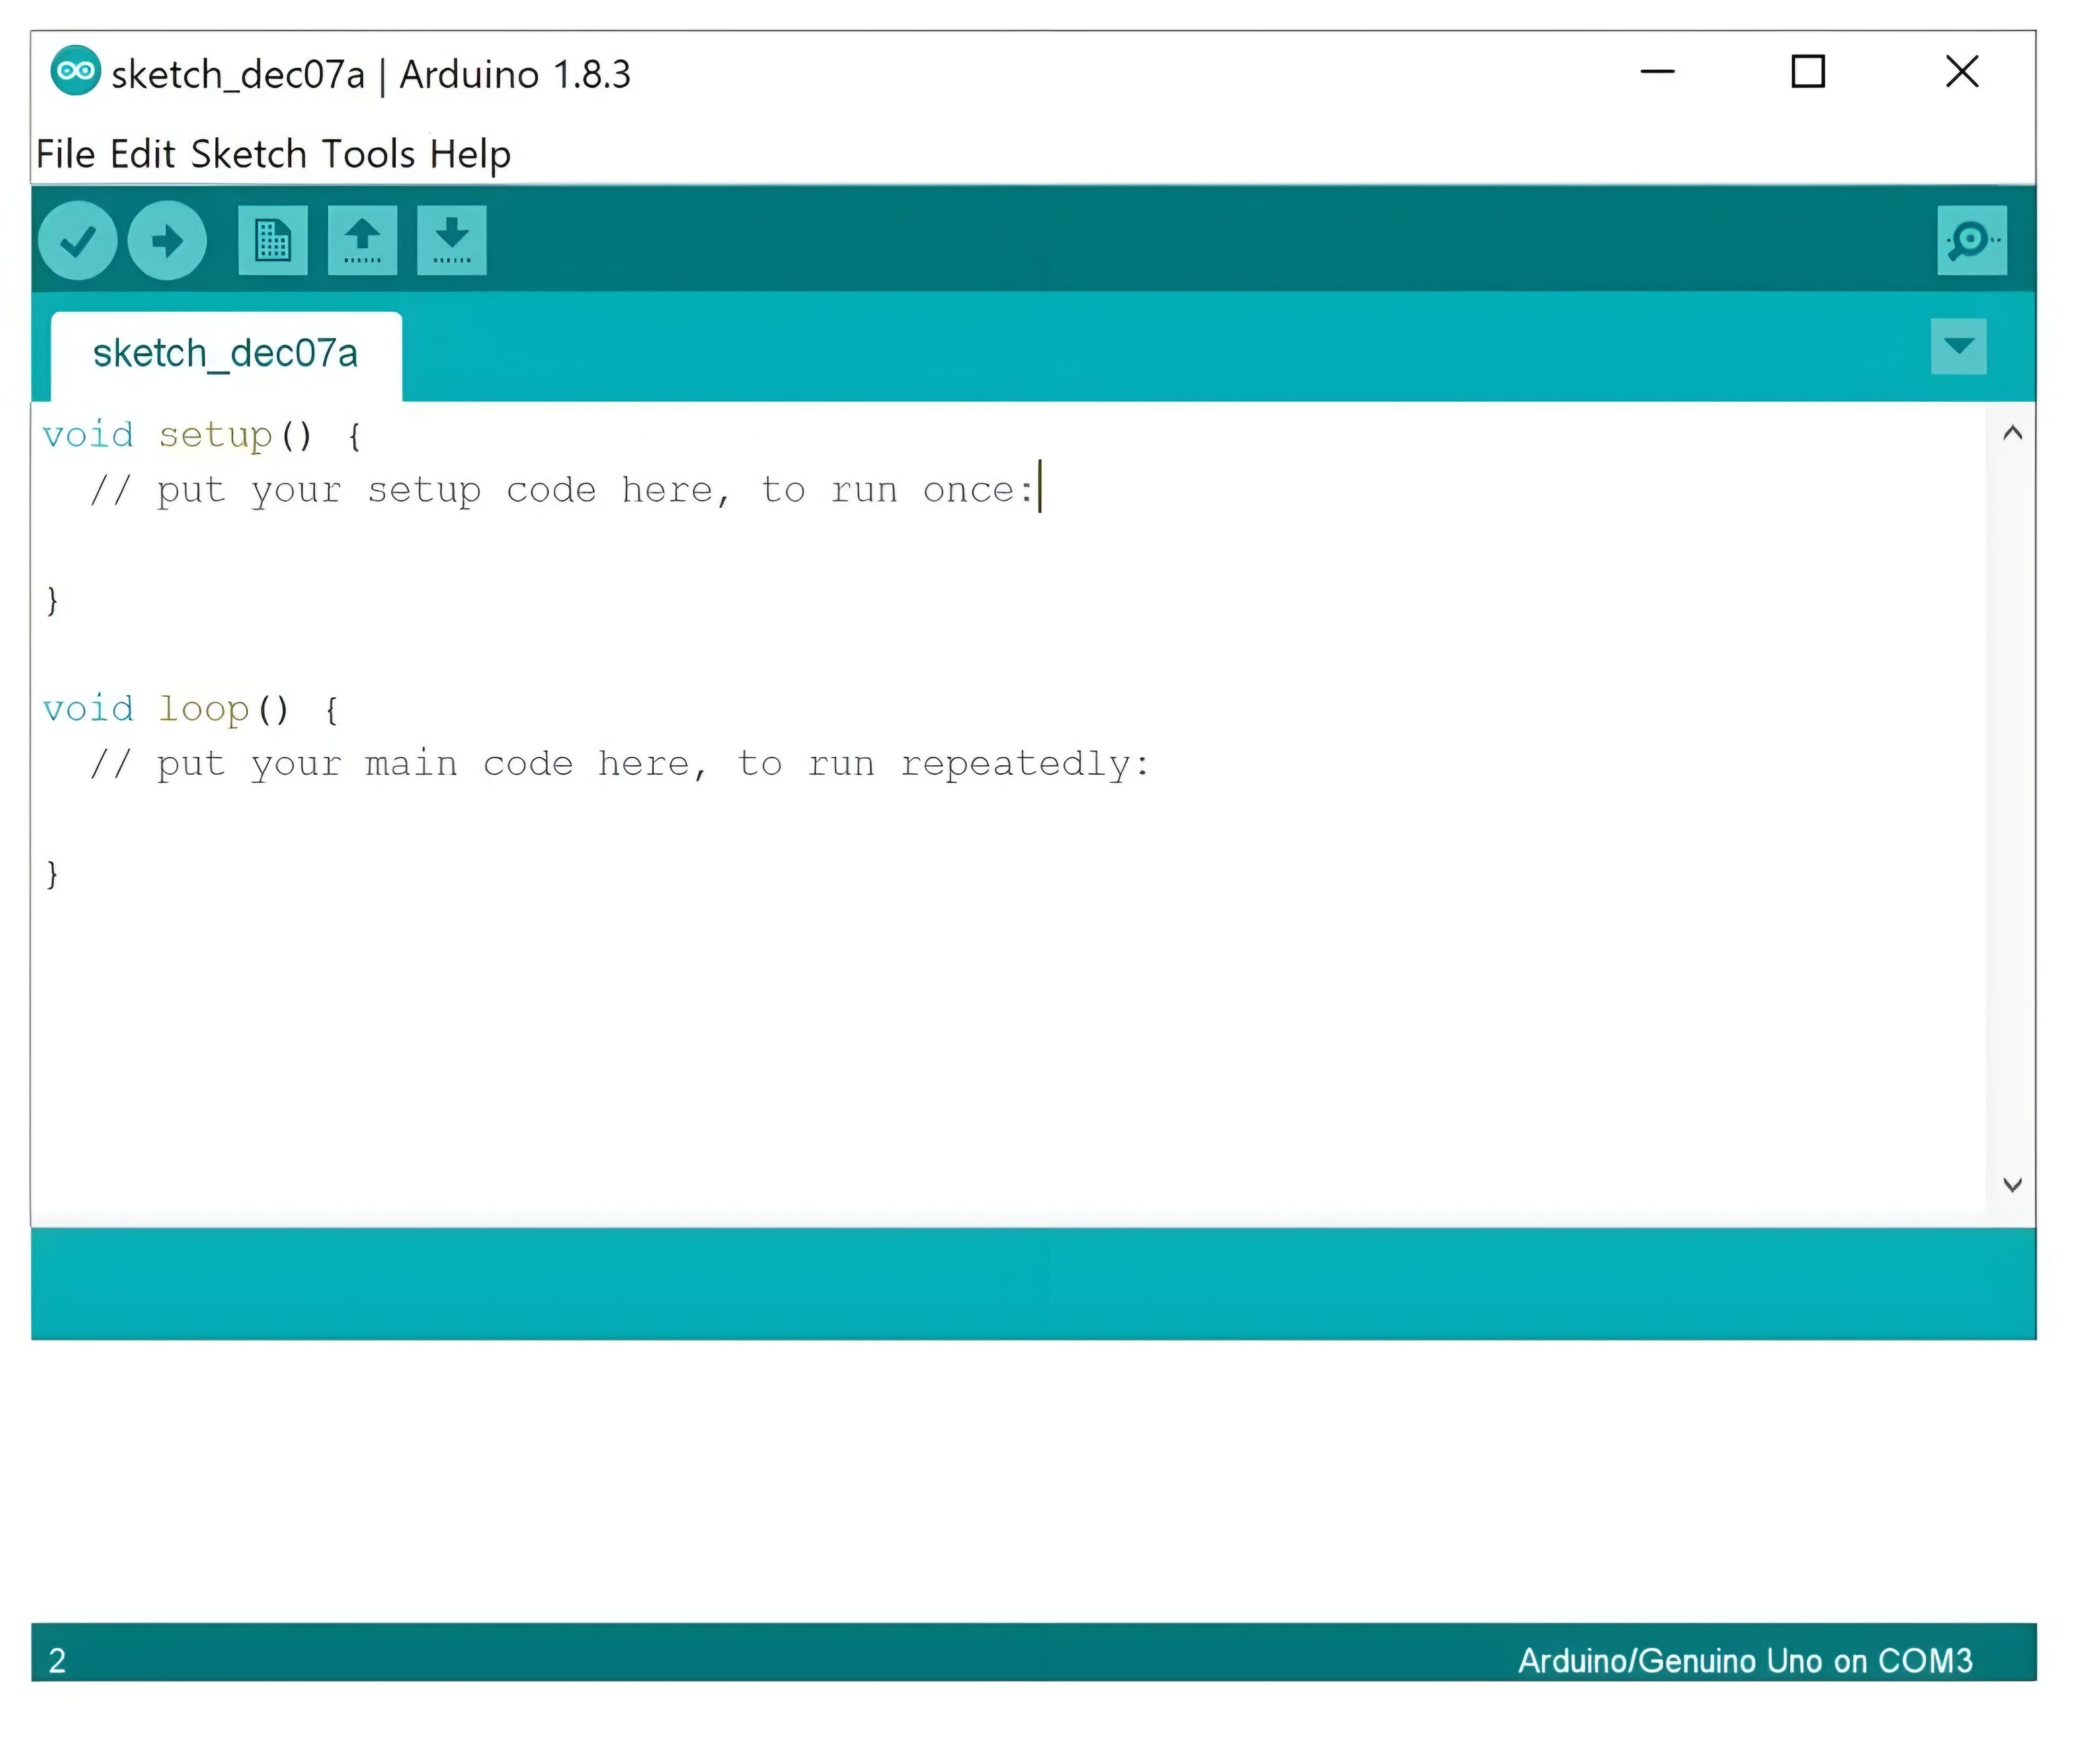
Components of the Arduino IDE
Let’s now talk about the main components of the IDE interface that you’ll interact with:
- Toolbar: Includes buttons to verify, upload, create a new sketch, open, save, and more.
- Text Editor: Where you write your code (sketch).
- Message Area: Displays compiler errors and notifications.
- Console: Shows detailed output like errors and upload status.
- Board & Port Selector: Lets you choose the connected Arduino board and COM port.
- Serial Monitor: A powerful built-in tool used to send and receive data from your Arduino in real time.
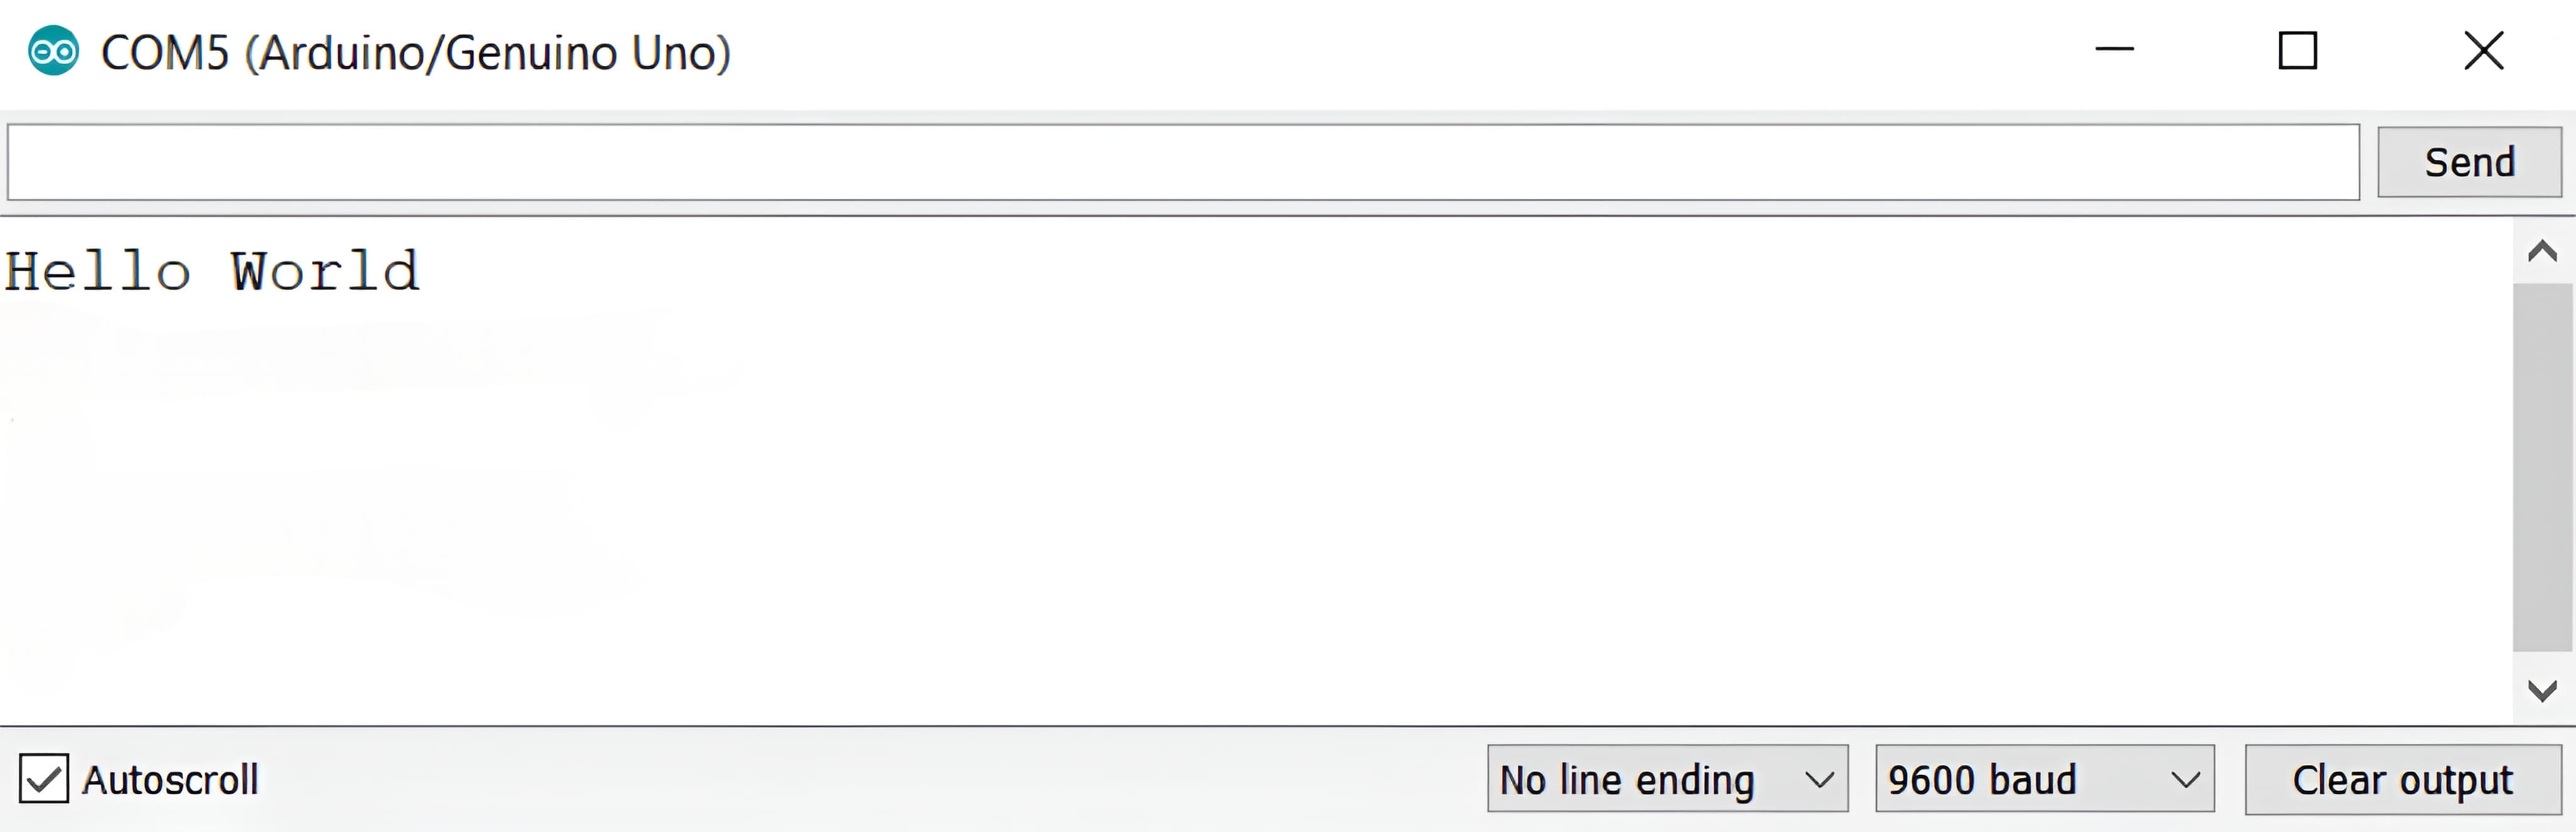
The Serial Monitor
The Serial Monitor is an essential debugging tool in the Arduino IDE. It allows you to print messages, read sensor outputs, and interact with the Arduino through serial communication.
For example, if you write:
1 | Serial.begin(9600); |
Real World Applications Of Arduino
Arduino is used in countless real-world applications, from simple hobby projects to advanced . You’ll find Arduino boards powering home automation systems, weather stations, wearable devices, interactive art installations, robotics, and even scientific instruments. Its versatility and ease of use make it a favorite among students, engineers, artists, and makers worldwide.
Components You Need to Get Started
- Arduino Uno Board
- USB Type B Cable
- Bread Board
- LEDs, resistors, jumper wires, potentiometer
- Sensors
- Computer with Arduino IDE installed.
If you don’t have the physical components right now, you can use the Tinkercad website to get started. It provides a graphical simulation environment where you can build circuits, write Arduino code, and test your projects virtually — all from your browser. Tinkercad also includes a built-in Arduino IDE and a Serial Monitor, allowing you to write and debug your code just like on the actual Arduino software.
How Arduino Code Talks to the Hardware
Programming Arduino is done using a simplified version of C/C++. The code you write is called a “sketch.” Every sketch has two main functions:
1 | void setup() { |
- setup(): Used to initialize settings, such as configuring pin modes or starting serial communication.
- loop(): Contains the main logic and runs continuously.
Example: Blink an LED
This classic example turns an LED on and off every second.
1 | void setup() { |
Before uploading your code to the Arduino, let’s first build the circuit.
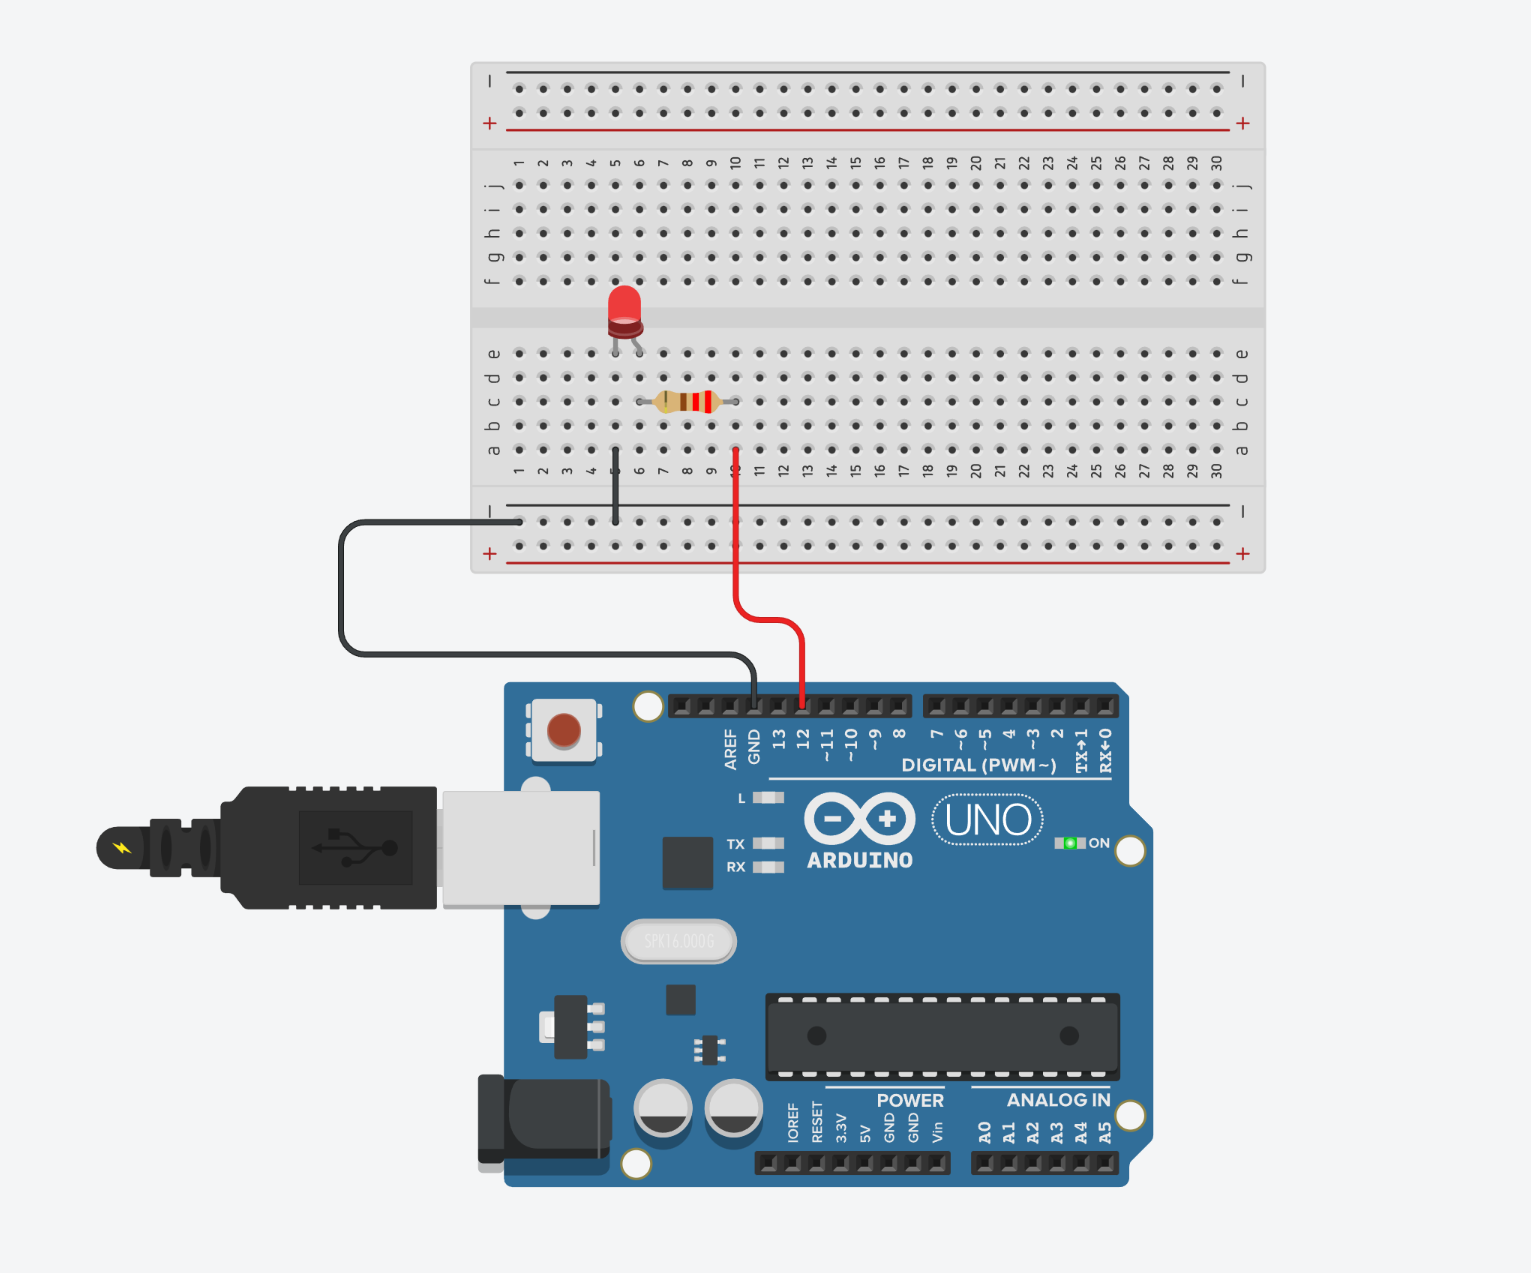
Once your circuit is ready, connect your Arduino to your computer. In the Arduino IDE, select the correct board type and COM port from the Tools menu. Click the “Upload” button to transfer your sketch to the Arduino. If everything is set up correctly, the built-in LED on pin 13 will start blinking on and off each second.
Key Functions
pinMode(pin_number, mode): Sets a pin as INPUT or OUTPUT.digitalWrite(pin_number, value): Sets a digital pin HIGH or LOW.digitalRead(pin_number): Reads the value from a digital pin.analogRead(pin_number): Reads an analog value (0–1023).analogWrite(pin_number, value): Writes an analog value (PWM, 0–255).
Experiment with different sensors and actuators by changing the code and wiring. The Arduino IDE provides many built-in examples to help you learn.
Conclusion
Arduino makes electronics and programming accessible to everyone, regardless of background or experience. With just a few components and simple code, you can start building interactive projects and learn valuable skills along the way. Whether you want to automate your home, create art, or explore robotics, Arduino is the perfect platform to turn your curiosity into real-world creations. Dive in, experiment, and let your imagination lead the way!
Further Resources
To deepen your understanding and expand your skills, consider exploring the following resources:
- Official Arduino Documentation: Comprehensive guides and reference materials — Arduino Docs
- Arduino Project Hub: Browse and contribute to a wide range of community projects — Project Hub
- Online Courses: Platforms like Coursera, Udemy, and edX offer structured Arduino courses for all levels.
- Community Forums: Engage with other makers, ask questions, and share your progress — Arduino Forum
Investing time in these resources will help you build a strong foundation and stay updated with the latest advancements in Arduino and embedded systems.